Import Contacts Into Salesforce
home
This example uses pre-packaged tools to intelligently connect with Salesforce.
Based on a simple use case, the application takes a CSV file of contacts and uploads the contact information to an active Salesforce org. It uses DataSense and Anypoint DataWeave to map and transform data, thereby facilitating quick integration with this Software as a Service (SaaS) provider.
Connecting with Salesforce
At times, you may find that you need to connect one or more of your organization's on-premises systems with a SaaS such as Salesforce. Ideally, these independent systems talk to each other and share data to enable automation of end-to-end business processes. Use Mule applications to facilitate communication between your on-prem system(s) and Salesforce.
This example doesn't include an example of SaaS-to-SaaS communication, however, you can also use Mule for this purpose.
Assumptions
- You are familiar with Mule and the Anypoint™ Studio interface. To increase your familiarity with Studio. If you aren't yet familiar with these items, skip the next section "Set Up and Run the Example" to examine this application's code snippets.
- You have a basic understanding of Mule flows, Mule Global Elements, and Anypoint DataWeave.
This application employs complex functionality to demonstrate a basic use case. The application accepts CSV files which contain contact information and uploads it into a Salesforce account, automatically inserting the correct data into each Salesforce field.
Set Up and Run the Example
Create, then run this example in your own instance of Anypoint Studio.
- Open the Example project in Anypoint Studio from Anypoint Exchange. Do not run the application.
- Log in to your Salesforce account. From your account menu (your account is labeled with your name), select Setup.
- In the left navigation bar, under the Personal Setup heading, click to expand the My Personal Information folder.
- Click Reset My Security Token. Salesforce resets the token and emails you the new one.
- Access the email that Salesforce sent and copy the new token onto your local clipboard.
- In your application in Studio, click the Global Elements tab.
- Double-click the Salesforce
Sfdcconfig global element to open its Global Element Properties panel. In the Security Token field, paste the new Salesforce token you copied from the email. Alternatively, configure the global element in the XML Editor. - Change the contents of the Username and Password fields to your account-specific values, then click OK to save your changes.
- This project includes a sample CSV file,
contacts.csv, that you can use to view the end-to-end functionality of this application. In the Package Explorer, click thesrc/main/resourcesfolder to expand it, then find thecontacts.csvfile inside this folder. - Double-click the File config tab in the Global Elements tab and set the Working Directory field to point to the
src/main/resourcesfolder. - In the Package Explorer, right-click the
import-contacts-into-salesforceproject, then select Run As > Mule Application. Studio runs the application on the embedded server. - The File connector in the application polls the input folder every ten seconds. It picks up the CSV file, processes it, then deposits it into the output folder in the same directory. Hint: tap the F5 key to refresh the contents of input and output folders.
- In your browser, access your Salesforce account, then navigate to the Contacts tab.
- Use the drop-down menu to display all contacts, then scan your contacts for two new entries: John Doe and Jane Doe.
- Stop the Mule application by clicking the red square terminate button in the console.
- Delete the three sample contacts from your Salesforce org.
How it Works
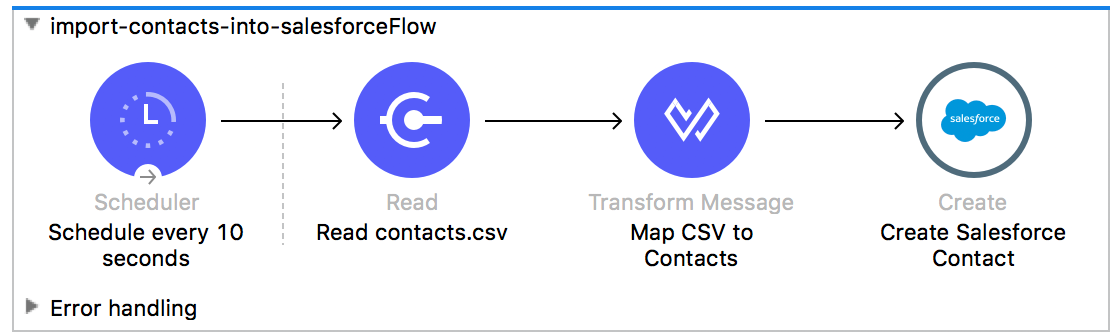
Using a single flow with three elements, this application accepts CSV files which contain contact information, then uploads the contacts to Salesforce.
The File Connector polls the input folder for new files every ten seconds. When it spots a new file, it reads it and passes the content to DataWeave. This transformer not only converts the format of the data from CSV to a collection, it automatically maps the input fields from the CSV file, FirstName, LastName, etc., to output fields that Salesforce uses in a collection. When the application has converted all the contacts in the file into a Salesforce-friendly collection, it uses a Salesforce Connector to push data into a Salesforce org. The connector's configurations specify the operation Create and the sObject type Contact. These specifications control how the data is uploaded to Salesforce. In this case, it creates new contacts.
While the application's functionality is straightforward, it uses a powerful Mulesoft tool, DataSense. Rather than building the application by adding and then configuring each of the elements manually according to the order in which they appear in the flow, DataSense completes the most difficult configurations automatically.
Project Documentation
Studio includes a feature that enables you to easily export all the documentation you have recorded for your project. Whenever you want to share your project with others outside the Studio environment, you can export the project's documentation to print, email or share online. Studio's auto-generated documentation includes:
- A visual diagram of the flows in your application
- The XML configuration which corresponds to each flow in your application
- The text you entered in the Notes tab of any building block in your flow
To export auto-generated Studio documentation, select a project from the Package Explorer, and choose File > Export Studio Documentation from the main toolbar.