Importing a CSV File into MongoDB
home
This example illustrates how to use the MongoDB connector to import data in a CSV (comma separated value) format from a local directory into MongoDB. This example also covers other important components in Anypoint Studio including DataWeave, Choice, and Foreach.
Prerequisites
This document describes the details of the example within the context of Anypoint Studio. This document assumes that you are familiar with Mule Runtime and the Anypoint Studio interface.
Example Use Case
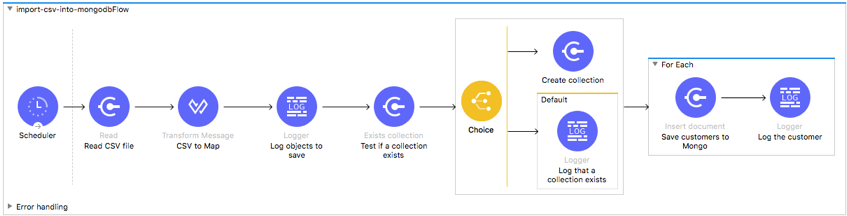
This example transforms a sample CSV file containing sales data to JSON format using the DataWeave transformer.
The JSON contains a collection called customers. The MongoDB connector checks if such a collection exists in the database. The result is stored in variable collectionExists. This variable is consequently used by the choice router to decide whether to route to a MongoDB connector that creates a collection or just use the default option. The last MongoDB connector embedded in the For Each scope, saves the object from the map, iteratively for each of the elements in the collection.
Set Up and Run the Example
Download MongoDB and install it. If you are are running a Linux based OS, Homebrew is an easy way to install MongoDB.
Run MongoDB:
Make sure that you have created /data/db in your filesystem according to the installation instructions
Open two instances of the command terminal. In the first window, start the MongoDB server by navigating to mongodb install path/bin and typing in mongod. You should get a message similar to the following message when your server is up and running:
2018-07-01T16:15:25.282-0700 [initandlisten] waiting for connections on port 27017In the second window run MongoDB by navigating to mongodb install path/bin and typing in mongo. You should get the following message when you are connected. MongoDB shell version v3.4.9
Stay in the second command terminal window and use the following commands to create a database and a user called mule who is granted permission to access the database:
db.createUser({user: "mule",pwd: "mule",roles:[{role: "userAdmin", db: "admin"}]})Open the Example project in Anypoint Studio from Anypoint Exchange.
Go to Global Elements and set the recently created user "mule" with password "mule" and database name "customers" for the MongoDB connector.
This project includes a sample CSV file, called input.csv, that you can use to witness end-to-end functionality of the application. In the Package Explorer, click the src/main/resources folder to expand it, then find the input.csv file inside this folder.
In the Global Elements double-click the File config tab and set the Working Directory field to point to src/main/resources folder.
Run the example project as a Mule Application.
Go to the MongoDB console (the second command terminal window) and type: db.customers.find()
The output shows the inserted objects similar to:
db.customers.find()
 { "_id" : ObjectId("53b2518b03643b83cf1cecde"),
 "firstname" : "aaa", "surname" : "vbbb", "phone" :
"ccc", "state" : "sss" }