Unit Testing with MUnit - Tutorial
home
Overview
This simple, short tutorial takes you through the process of creating a series of MUnit 2.x tests that validate the behavior of a simple code example.
This tutorial uses only core components of Mule Runtime 4. No Anypoint Connectors are used; however, you can easily apply what you learn here to applications that use Anypoint Connectors.
Sample Code
The sample code for this tutorial is fairly simple and uses some of Mule's most common message processors. It implements the following basic use case:
- It receives an HTTP request.
- It extracts data from the request and uses the data to determine how to route a message through the application.
- It decides how to create a response.
The code is located in the file src/main/mule/business-logic.xml in the project.
Figure 1: The content of business-logic.xml
<mule xmlns:http="http://www.mulesoft.org/schema/mule/http" xmlns="http://www.mulesoft.org/schema/mule/core" ... >
<http:listener-config name="HTTP_Listener_config" doc:name="HTTP Listener config" >
<http:listener-connection host="0.0.0.0" port="${http.port}" />
</http:listener-config>
<configuration-properties file="mule-artifact.properties" doc:name="Configuration properties" />
<flow name="mainFlow" >
<http:listener config-ref="HTTP_Listener_config" path="/" doc:name="HTTP Listener" allowedMethods="GET"/>
<set-payload value="#[attributes.queryParams.url_key]" doc:name="Set query param 'url_key' to payload" />
<flow-ref name="secondaryFlow" doc:name="secondaryFlow" />
<choice doc:name="Choice" >
<when expression="#[vars.flowValue == 'flowValue_1']" >
<set-payload value="#['responsePayload_1']" doc:name="Set Response Payload" />
</when>
<otherwise >
<set-payload value="#['responsePayload_2']" doc:name="Set Response Payload" />
</otherwise>
</choice>
</flow>
<flow name="secondaryFlow" >
<choice doc:name="Choice" >
<when expression="payload == 'payload_1'" >
<flow-ref name="firstSubFlow" doc:name="firstSubFlow" />
</when>
<otherwise >
<flow-ref name="secondSubFlow" doc:name="secondSubFlow" />
</otherwise>
</choice>
</flow>
<sub-flow name="firstSubFlow" >
<set-variable variableName="flowValue" value="flowValue_1" doc:name="Set Variable" />
</sub-flow>
<sub-flow name="secondSubFlow" >
<set-variable variableName="flowValue" value="flowValue_2" doc:name="Set Variable" />
</sub-flow>
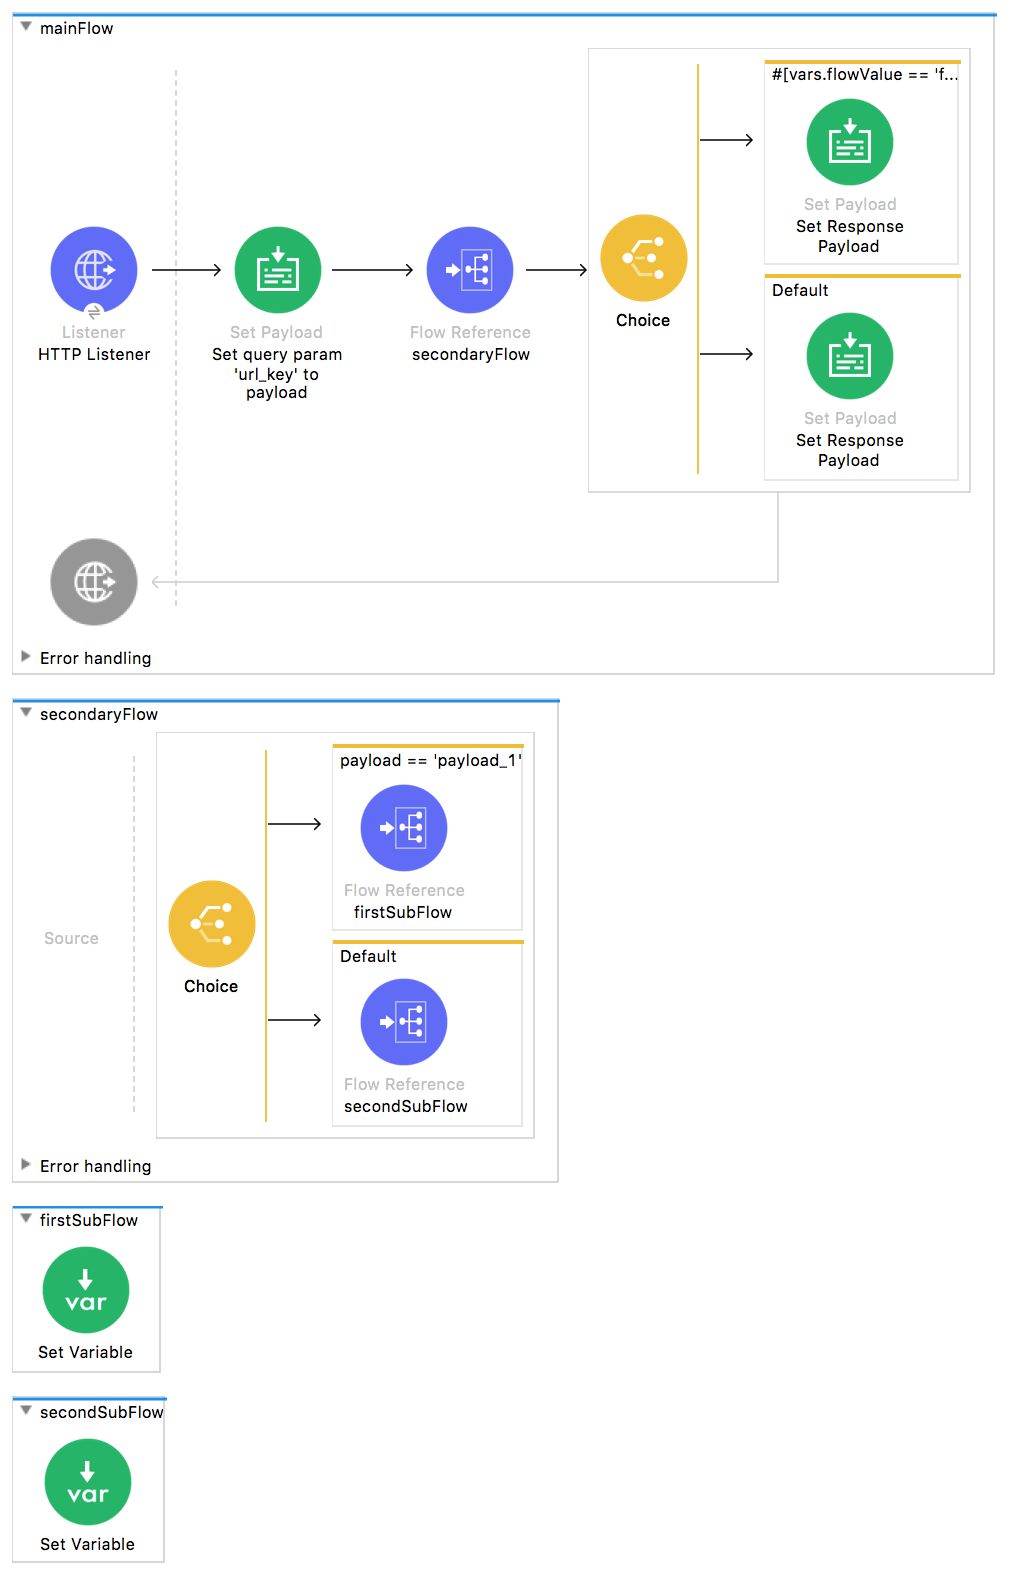
</mule>Let's analyze this XML by looking at the two flows and then at the two subflows.
The mainFlow Flow
The first flow is the entry point of the application because it contains the HTTP listener. Here's how it works:
- Receives data from the HTTP request.
- Calls the
secondaryFlowflow for further processing. - Depending on the value of the invocation variable
flowValueset bysecondaryFlow, returns eitherresponsePayload_1orresponsePayload_2.
Figure 2: The XML for the flow mainFlow
<flow name="mainFlow" >
    <http:listener config-ref="HTTP_Listener_config" path="/" doc:name="HTTP Listener" allowedMethods="GET"/>
    <set-payload value="#[attributes.queryParams.url_key]" doc:name="Set query param 'url_key' to payload" />
    <flow-ref name="secondaryFlow" doc:name="secondaryFlow" />
    <choice doc:name="Choice" >
        <when expression="#[vars.flowValue == 'flowValue_1']" >
            <set-payload value="#['responsePayload_1']" doc:name="Set Response Payload" />
        </when>
        <otherwise >
            <set-payload value="#['responsePayload_2']" doc:name="Set Response Payload" />
        </otherwise>
    </choice>
</flow>
The secondaryFlow Flow
The second flow in the app, secondaryFlow, routes the message to one of two subflows, based on the payload received as input. It works as follows:
- Evaluates whether the payload that enters
secondaryFlowmeets a condition. - Calls
firstSubFlow, if the condition is fulfilled. If the condition is not fulfilled, the flow moves to the next step. - Calls
secondSubFlow, if the condition is not fulfilled.
Figure 3: The XML for the flow secondaryFlow
<flow name="secondaryFlow" >
    <choice doc:name="Choice" >
        <when expression="payload == 'payload_1'" >
                <flow-ref name="firstSubFlow" doc:name="firstSubFlow" />
        </when>
        <otherwise >
            <flow-ref name="secondSubFlow" doc:name="secondSubFlow" />
        </otherwise>
    </choice>
</flow>
The Two Subflows
Finally, we have two subflows, each of which sets a value for an invocation variable named flowValue.
Figure 4: The XML for the two subflows
<sub-flow name="firstSubFlow" >
    <set-variable variableName="flowValue" value="flowValue_1" doc:name="Set Variable"  />
</sub-flow>

<sub-flow name="secondSubFlow" >
    <set-variable variableName="flowValue" value="flowValue_2" doc:name="Set Variable" />
</sub-flow>
Creating Tests
When performing unit tests, it's always better to take a ground-up approach, first testing the building blocks of the code, then testing the more complex code. You can compare this sequence to setting pillars and ensuring that they'll hold, before building the rest of the bridge across them.
We'll start by testing secondaryFlow.
Ideally, you should test each and every flow and subflow in your application in order to validate that each one of them behaves as expected. Because we've complicated things a little in order to show you more scenarios, we'll skip testing the subflows. If we meant to deploy this application to production, we would start by testing those two subflows.
Two Requirements for MUnit 2.x Test Suites
Each MUnit 2.x test file must contain the following elements:
munit:config- An
importelement
In the import section, we define the files needed for this suite of tests to run. This section usually includes the file containing the flows we want to test and additional files required for the first file to work. These are shown in the snippet below:
<munit:config name="test-suite.xml" doc:name="MUnit configuration"/>
<import file="business-logic.xml" doc:name="Import" />
Testing: secondaryFlow
This flow contains a choice router, which provides two different paths that the code can follow. Here we will explain how to test first of them. The second one is similar.
secondaryFlow - First test case
<munit:test name="secondaryFlowTest_1" description="MUnit Test" >
    <munit:execution >
        <munit:set-event doc:name="Set Message payload == payload_1" >
            <munit:payload value="#['payload_1']" />
        </munit:set-event>
        <flow-ref name="secondaryFlow" doc:name="secondaryFlow" />
    </munit:execution>
    <munit:validation >
        <munit-tools:assert-that expression="#[vars.flowValue]" is="#[equalTo('flowValue_1')]" doc:name="Assert payload" />
        <munit-tools:verify-call processor="mule:flow-ref" doc:name="Verify call" times="1">
            <munit-tools:with-attributes>
                <munit-tools:with-attribute attributeName="name" whereValue="#['firstSubFlow']" />
            </munit-tools:with-attributes>
        </munit-tools:verify-call>
    </munit:validation>
</munit:test>
Here's how it works:
- Define the input message to be sent to the production flow
secondaryFlow. - Make a call to production code.
- Verify that the value of variable flowValue is correct.
- Verify that the subflow 'firstSubFlow' was called exactly once.
This test looks fairly simple, but it has a few points to highlight.
The first thing we do is to create an input message. This is a very common scenario; you will probably have to create input messages for the flows that you'll test. In this example, it was only necessary to define a payload, but further down in this tutorial we'll see how to create more complex messages.
For the purposes of this test, we can be confident that the code works properly by simply ensuring the variable that was supposed to be set is set to correct value and the correct message processor was called.
WARNING: In MUnit 2.x, you mock or verify flow-ref, not the flow and sub-flow, as in MUnit 1.x.
Testing: mainFlow
This flow contains an http-listener, but in order to show you different scenarios, we are not going to call it. Because we are not calling the HTTP listener, we need to take a few other actions for this test to work properly.
mainFlow - Test case
<munit:test name="test_withMock_1" description="MUnit Test" >
    <munit:behavior >
        <munit-tools:mock-when processor="mule:set-payload" doc:name="Mock when" >
            <munit-tools:with-attributes >
                <munit-tools:with-attribute attributeName="doc:name" whereValue="#["Set query param 'url_key' to payload"]" />
            </munit-tools:with-attributes>
            <munit-tools:then-return >
                <munit-tools:payload value="#['']" />
            </munit-tools:then-return>
        </munit-tools:mock-when>
        <munit-tools:mock-when processor="mule:flow-ref" doc:name="Mock when" >
            <munit-tools:with-attributes >
                <munit-tools:with-attribute attributeName="name" whereValue="#['secondaryFlow']" />
            </munit-tools:with-attributes>
            <munit-tools:then-return >
                <munit-tools:payload value="#['']" />
                <munit-tools:variables >
                    <munit-tools:variable key="flowValue" value="#['flowValue_1']" />
                </munit-tools:variables>
            </munit-tools:then-return>
        </munit-tools:mock-when>
    </munit:behavior>
    <munit:execution >
        <flow-ref name="mainFlow" doc:name="mainFlow" />
    </munit:execution>
    <munit:validation >
        <munit-tools:assert-that expression="#[payload]" is="#[equalTo('responsePayload_1')]" doc:name="Assert that" />
    </munit:validation>
</munit:test>
Here's how it works:
- Define a mock for the set-payload message processor in
exampleFlow. - Define a mock for the call to
exampleFlow2. - Make a call to production code.
- Validate success of the test by asserting the returned payload.
The first thing to notice in this test is that we are defining mocks. Mocks are what allow you to isolate your flow, distinguishing it from third-party systems and any other flows in your application.
The first mock we define is for the set-payload message processor. We do this because this message processor expects a certain set of inbound variables, but we won't send them in this test -- hence, for the code to succeed we need to mock the behavior of the set-payload message processor.
Notice that we are not actually returning a payload. The payload in the set-payload message processor is needed by secondaryFlow. In this unit test, we'll trust secondaryFlow to work as expected, and will mock it as well.
TIP: When doing unit tests, you isolate your flow from third-party systems and other flows and trust they will work as expected. In turn, you must test each third-party system or flow with its own, specific test.
If you've been reading this tutorial from the beginning, you already know that in MUnit 2.x, you mock flow-ref message processors. That's what we're doing here, mocking the secondaryFlow flow reference which was called from mainFlow.
The purpose of secondaryFlow was to set the value of the invocation variable flowValue. If you look closely at this mock, you'll see that we are telling the mocked flow to return a message that contains an invocation variable named flowValue with a value of flowValue_1. This is what should happen in the first test scenario.
Now that our two mocks are in place, we'll run the production code:
<flow-ref name="mainFlow" doc:name="mainFlow"/>The only thing that remains to be done for this test is to define its success criteria. For the purposes of this example, we'll determine whether it was successful based on the payload returned by the flow.
<munit-tools:assert-that expression="#[payload]" is="#[equalTo('responsePayload_1')]" doc:name="Assert that" />As you can see, we are validating that the payload returned is equal to that set by the first branch of the choice in the production code, i.e. 'responsePayload_1.
The other branches could be tested similarly.
Functional Testing
All of the tests explained so far were unit tests, which try to isolate each flow as much as possible from the other flows.
You might also want to do a functional test, i.e. an end-to-end test. In our example, this means that we are not going to mock any message processor. To implement a test in this way, we need to correctly define the message that we'll send to the production code.
In previous tests, we mocked the first message processor of mainFlow because it needed the message to contain specific values. Since we are not mocking anything now, we will have to create that message.
mainFlow - Functional test
<munit:test name="functionalTest_mainFlow_1" description="MUnit Test" >
    <munit:execution >
        <munit:set-event doc:name="Set Query Parameter url_key=payload_1" >
            <munit:payload value="#['']" />
            <munit:attributes value="#[{queryParams: {url_key: 'payload_1'}}]" />
        </munit:set-event>
        <flow-ref name="mainFlow" doc:name="mainFlow" />
    </munit:execution>
    <munit:validation >
        <munit-tools:assert-that expression="#[vars.flowValue]" is="#[equalTo('flowValue_1')]" doc:name="Assert payload" />
    </munit:validation>
</munit:test>
This test is very similar to the others for mainFlow, without the mocks. Let's check again the implementation of mainFlow, specifically the set-payload:
<set-payload value="#[attributes.queryParams.url_key]" doc:name="Set query param 'url_key' to payload" />The set-payload message processor is expecting the message to have an attribute named queryParams, which should be a map. The map should contain the key url_key.
The code below shows how to create such a message:
<munit:set-event doc:name="Set Query Parameter url_key=payload_1" >
    <munit:payload value="#['']" />
    <munit:attributes value="#[{queryParams: {url_key: 'payload_1'}}]" />
</munit:set-event>
Conclusion
In this tutorial, we've seen:
- How to create MUnit 2.x tests
- How to create Mule messages
- How to create mocks
- How to run verifications and assertions
In short, we've covered a great deal of the MUnit 2.x features.
As you code, your tests may become as large and complex as your production code. The tools provided by MUnit 2.x will help you create great tests while maintaining the quality of your code.