Salesforce and Microsoft Dynamics CRM Contact Aggregation
home
Aggregates contacts from Salesforce and Microsoft Dynamics into a CSV file. This basic pattern can be modified to collect from more or different sources and to produce formats other than CSV. This integration application is triggered by an HTTP call, which can be done either manually or programmatically. Contacts are sorted such that the contacts only in Salesforce appear first, followed by contacts only in Microsoft Dynamics and lastly by contacts found in both systems. The custom sort or merge logic can be easily modified to present the data as needed. This template also serves as a base for building APIs using the Anypoint Platform.
Use Case
As an administrator I want to aggregate contacts from Salesforce and MS Dynamics instances and compare them to see which contacts can only be found in one of the two and which contacts are in both instances.
This template:
- Generates the result in the format of a CSV Report sent by mail.
- Extracts data from two systems, aggregates the data, compares values of fields for the objects, and generates a report on the differences.
- Gets contacts from Salesforce and MS Dynamics, compares by the email address of the contacts, and generates a CSV file which shows contact name in Salesforce, contact name in MS Dynamics, Email and contacts IDs in Salesforce and MS Dynamics. The report is sent by the email to a configured group of email addresses.
Considerations
To make this Anypoint Template run, be aware of your own Salesforce field configuration:
- Where can I check that the field configuration for my Salesforce instance is the right one? Salesforce: Checking Field Accessibility for a Particular Field
- Can I modify the Field Access Settings? How? Salesforce: Modifying Field Access Settings
As a Source of Data
If the user configured in the template for the source system does not have at least read only permissions for the fields that are fetched, a InvalidFieldFault API fault appears.
java.lang.RuntimeException: [InvalidFieldFault [ApiQueryFault [ApiFault  exceptionCode='INVALID_FIELD'
exceptionMessage='
Account.Phone, Account.Rating, Account.RecordTypeId, Account.ShippingCity
^
ERROR at Row:1:Column:486
No such column 'RecordTypeId' on entity 'Account'. If you are attempting to use a custom field, be sure to append the '__c' after the custom field name. Reference your WSDL or the describe call for the appropriate names.'
]
row='1'
column='486'
]
]
Run It!
Browse to the local HTTP endpoint with the port you configured in your common.properties file. For example for port 9090, browse to http://localhost:9090/generatereport and this creates a CSV report and sends it to the mail set.
Importing the Template into Studio
In Studio, click the Exchange X icon in the upper left of the taskbar, log into your
Anypoint Platform credentials, search for the template, and click Open.
Running on Studio
After opening your template in Anypoint Studio, follow these steps to run it:
- Locate the properties file
mule.dev.properties, in src/main/resources - Complete all the properties required as per the examples in the section "Properties to be configured".
- Once that is done, right click your template project folder .
- Hover your mouse over
Run as. - Click
Mule Application (configure). - Inside the dialog, select Environment and set the variable
mule.envto the valuedev. - Click
Run.
Running on Mule Runtime Standalone
Complete all properties in one of the property files, for example in mule.prod.properties and run your app with the corresponding environment variable to use it. To follow the example, this is mule.env=prod.
Running on CloudHub
When creating your application in CloudHub, you need to go to Deployment > Advanced to set environment variables detailed in "Properties to be configured" as well as the mule.env.
After your app is all set and started, if you choose the msdynandsfdccontactaggregation as the domain name, to trigger the use case you need to access http://msdynandsfdccontactaggregation.cloudhub.io/generatereport to cause the report to be sent to the email addresses you configured.
Deploying Your Template on CloudHub
Studio provides you with an easy way to deploy your template directly to CloudHub. Right click your project name
in Package Explorer and select Anypoint Platform > Deploy to CloudHub.
Properties to Configure With Examples
To use this template, configure properties such as credentials, configurations, etc. either in a properties file or in CloudHub as Environment Variables.
Application Configuration
HTTP Connector configuration
- http.port
9090
Salesforce Connector configuration
sfdc.username
bob.dylan@orgasfdc.password
DylanPassword123sfdc.securityToken
avsfwCUl7apQs56Xq2AKi3X
MS Dynamics Connector configuration
msdyn.user
user@yourorg.onmicrosoft.commsdyn.password
yourPasswordmsdyn.url
https://yourorg.api.crm4.dynamics.com/XRMServices/2011/Organization.svcmsdyn.retries
2
SMTP Services configuration
smtp.host
smtp.gmail.comsmtp.port
587smtp.user
exampleuser@gmail.comsmtp.password
ExamplePassword456
Mail details
mail.from
exampleuser1@gmail.commail.to
exampleuser2@gmail.commail.subject
SFDC Contacts Reportmail.body
Contacts report comparing contacts from SFDC Accountsattachment.name
report.csv
API Calls
Salesforce imposes limits on the number of API Calls that can be made. However, we make an API call to Salesforce only once during aggregation.
Customize It!
Mule applications are based on XML files. The following files are available as well as those for test classes and Mule application files. You can add your own code as needed.
The main XML files in this application are:
- config.xml
- endpoints.xml
- businessLogic.xml
- endpoints.xml
- errorHandling.xml
config.xml
Configuration for Connectors and Configuration Properties are set in this file. You can change the configuration here, all parameters that can be modified here are in properties file, and this is the recommended place to do it so. Of course if you want to do core changes to the logic you need to modify this file.
In the visual editor, this can be found on the Global Element tab.
businessLogic.xml
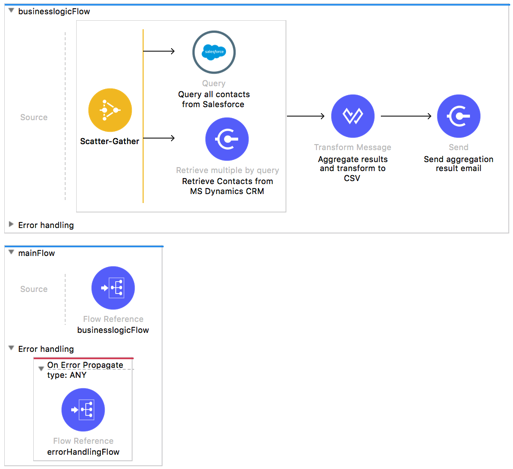
Functional aspect of the template is implemented in this XML file, directed by one flow responsible of conducting the aggregation of data, comparing records and finally formatting the output, in this case being a report.
Use the Scatter-Gather component to query the data in different systems. After that the aggregation is implemented in DataWeave 2 script using Transform component.
Aggregated results are sorted by source of existence:
- Accounts only in Salesforce
- Accounts only in MS Dynamics
- Accounts in both Salesforce and MS Dynamics
The are transformed to CSV format. The final report in CSV format is sent to email, that you configured in mule.*.properties file.
endpoints.xml
This is the file with the endpoint to start the aggregation. This template has an HTTP Inbound Endpoint as the way to trigger the use case.
Trigger Flow
HTTP Inbound Endpoint - Start Report Generation
${http.port}is set as a property to be defined either on a property file or in CloudHub environment variables.The path configured by default is
generatereportand you are free to change for the one you prefer.The host name for all endpoints in your CloudHub configuration should be defined as
localhost. CloudHub then routes requests from your application domain URL to the endpoint.
errorHandling.xml
This is the right place to handle how your integration reacts depending on the different exceptions.
This file holds Error Handling that is referenced by the main flow in the business logic.