Authenticating Salesforce using OAuth 2.0
This example shows you how to connect to Salesforce using OAuth as the security protocol.
Connect with Salesforce
At times, you might find that you need to connect one or more of your organization's on-premises systems with a SaaS, such as Salesforce. Ideally, these independent systems would talk to each other and share data to enable automation of end-to-end business processes. Use Mule applications to facilitate communication between your on-prem system(s) and Salesforce. (Though this use case does not extend as far, you can also use Mule to facilitate communication between SaaS providers).
Assumptions
This document assumes that you are familiar with Mule and the Anypoint™ Studio interface. Further, this example assumes that you have a basic understanding of Mule flows and Mule Global Elements.
This document describes the details of the example within the context of Anypoint Studio and includes configuration details for XML Editor where relevant.
Example Use Case
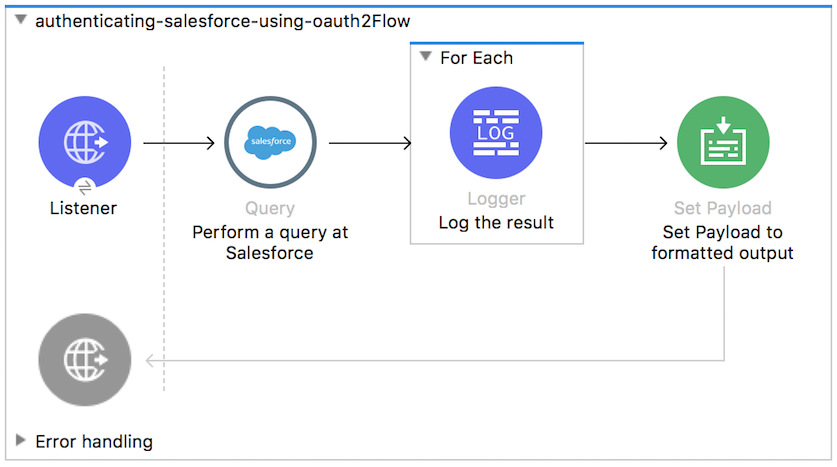
This application employs Salesforce Connector to enable OAuth authentication before performing the integration process. Salesforce is queried to retrieve all contacts from the Salesforce account. To keep it simple, the Process Records Phase only prints the contacts to the log.
Set Up and Run the Example
- Open the Example project in Anypoint Studio from Anypoint Exchange. Do not run the application.
- In your application in Studio, click the Global Elements tab. Double-click the HTTP Listener global element to open its Global Element Properties panel. Change the contents of the port field to required HTTP port (e.g., 8082).
- Log in to your Salesforce account. From your account menu (your account is labeled with your name), select Setup.
- In the left navigation bar, under the Build heading, click to expand the Create folder.
- Click Apps. Under Connected Apps, click New.
- Fill in all the required fields. Check Enable OAuth Settings. Set Callback URL to http://localhost:8082/oauth2callback. Move Full Access (full) to Selected OAuth scopes. Click Save. Stay on this page.
- In your application in Studio, double-click the Salesforce_ config global element to open its Global Element Properties panel.
- In the Connection field choose OAuth v2.0 and paste the values from the Salesforce App form to the Consumer Key and Consumer Secret fields.
- Fill the field External callback url with the callback URL from your Salesforce App settings (e.g., http://localhost:8082/oauth2callback).
- In the Package Explorer, right-click the authenticating-salesforce-using-oauth2 project name, then select Run As > Mule Application. Studio runs the application on the embedded server.
- Open your browser and put http://localhost:8082/authorize?resourceOwnerId=demo in the address bar. You will redirected to the Salesforce Login page and asked for your credentials. Allow access for this app.
- Now, change the URL in browser to http://localhost:8082/contacts?resourceOwnerId=demo
- Go back to Anypoint Studio and the console log should contain lines like these: INFO 2014-10-27 12:49:25,779 [[authenticating-salesforce-using-oauth2].connector.http.mule.default.receiver.02] org.mule.examples.LoggerIterator: contact: {LastModifiedDate=2014-08-25T13:21:00.000Z, Id=0032000001INNfoAAH, LastName=Pickwick, type=Contact}INFO 2014-10-27 12:49:25,779 [[authenticating-salesforce-using-oauth2].connector.http.mule.default.receiver.02] org.mule.examples.LoggerIterator: contact: {LastModifiedDate=2014-08-25T13:21:00.000Z, Id=0032000001INGnuAAH, LastName=GaultThe, type=Contact}INFO 2014-10-27 12:49:25,780 [[authenticating-salesforce-using-oauth2].connector.http.mule.default.receiver.02] org.mule.examples.LoggerIterator: contact: {LastModifiedDate=2014-08-25T13:21:00.000Z, Id=0032000001IOBe4AAH, LastName=Hobbit, type=Contact}INFO 2014-10-27 12:49:25,780 [[authenticating-salesforce-using-oauth2].connector.http.mule.default.receiver.02] org.mule.examples.LoggerIterator: contact: {LastModifiedDate=2014-08-29T15:48:11.000Z, Id=0032000001IOuBtAAL, LastName=Darko, type=Contact}INFO 2014-10-27 12:49:25,780 [[authenticating-salesforce-using-oauth2].connector.http.mule.default.receiver.02] org.mule.examples.LoggerIterator: contact: {LastModifiedDate=2014-09-11T19:19:58.000Z, Id=0032000001IP8uiAAD, LastName=Burke, type=Contact}
How it Works
The request-response inbound HTTP endpoint receives requests that the end user submits to the Web service. Because it has a request-response message exchange pattern, this HTTP endpoint is responsible for both receiving and returning messages. The Salesforce Connector is used for both authorization and data retrieval. A query for all contacts is sent to the Salesforce instance and later is processed by the custom Java component.