Exposing a RESTful resource using the HTTP connector
home
This example application illustrates how to use the Mule ESB to expose a RESTful resource using the HTTP connector. After reading this document, and creating and running the example in Mule, you should be able to leverage what you have learned to create a simple HTTP request-response application that is able to expose a RESTful resource by providing different verbs (HTTP methods) using JSON data.

JSON processing
This example was designed to demonstrate interactions between an end user and Mule via an HTTP request, and Mule's ability to process data in the JSON format.
Assumptions
This document describes the details of the example within the context of Anypoint™ Studio, Mule's graphical user interface (GUI). This document assumes that you are familiar with Mule ESB and the Anypoint Studio interface.
Example Use Case
In this example, a user calls the Mule application by submitting a request via REST client (i.e., entering a specific URL, http://localhost:8081/person/1). The application receives the request and process it based on the URL. The application is capable of retrieving and inserting person data.
To send this request, use a browser extension such as Advanced Rest Client (Google Chrome), or the curl command line utility.
Set Up and Run the Example
As with other examples, you can create template applications straight out of the box in Anypoint Studio. You can tweak the configurations of these use case-based examples to create your own customized applications in Mule.
Follow the procedure below to create, then run the HTTP with JSON application.
- Open the Example project in Anypoint Studio from Anypoint Exchange.
- In your application in Studio, click the **Global Elements** tab. Double-click the HTTP Listener global element to open its **Global Element Properties** panel. Change the contents of the **port** field to required HTTP port (for example, 8081).
- In the Package Explorer in Studio, right-click the project name, then select Run As > Mule Application. Studio runs the application and Mule is up and kicking!
- Send a POST request to:
http://localhost:8081/personwith the body equal to:
{   "firstname":"John",   "lastname":"Doe",   "age": "12",   "address":  {  "streetAddress":"Lincoln St.",
  "city":"San Francisco",
  "state":"CA",
  "zipCode":"90401"  }}
You should receive a response saying a person was created successfully. For example:{ "personId": "123456789", "message": "Person was created"} - Send a GET request to
http://localhost:8081/person. You should receive a response with all created persons. If you inserted only one person in Step 4, then you should get only that person. - Take the value of `personId` from the previous response and send a GET request to
http://localhost:8081/person/{personId}
You should receive a response with the person's data:
{"personId": "123456789", "firstname":"John","lastname":"Doe","address":{"streetAddress":"Lincoln St.","city":"San Francisco","state":"CA","zipCode":"90401"},"age":12}
How it Works
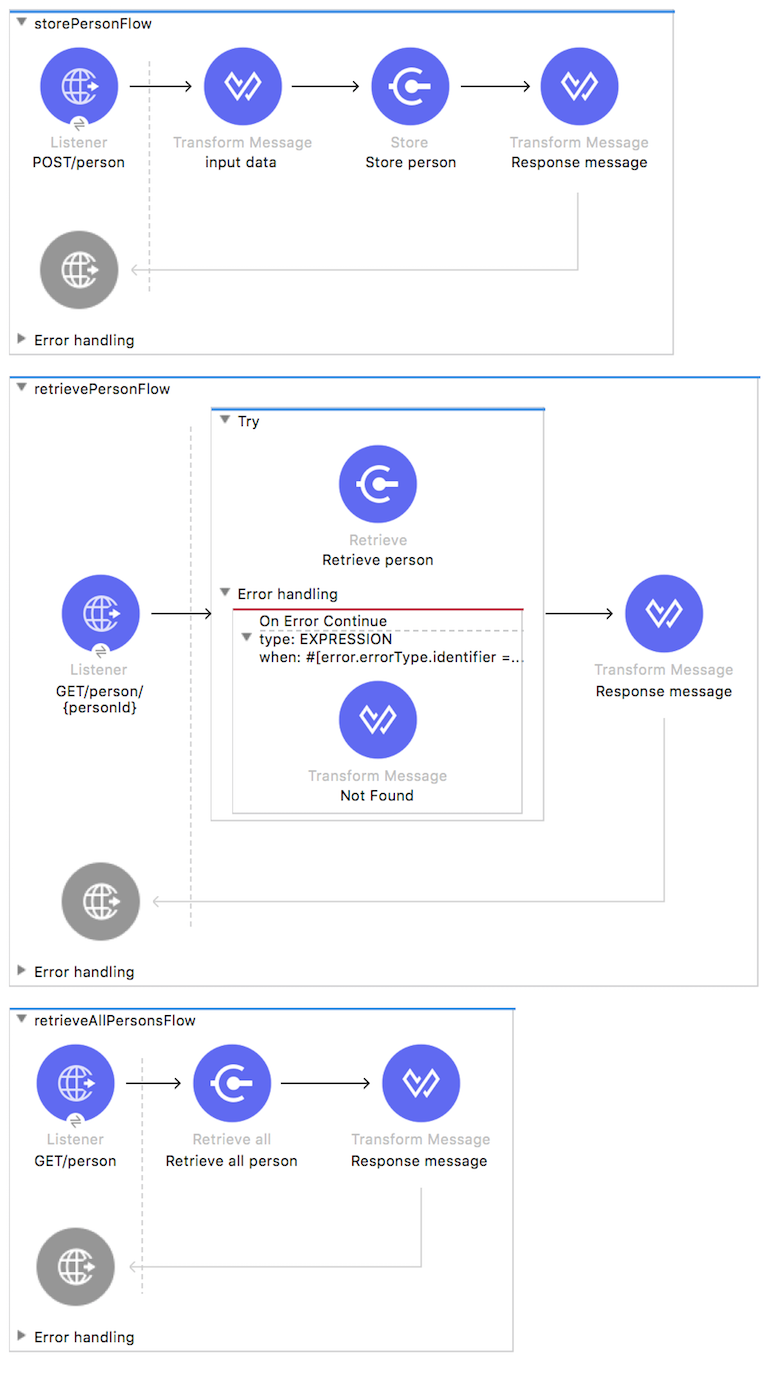
The Exposing a RESTful resource using the HTTP connector example application consists of three, simple flows which receive end user HTTP requests, set payloads based on the request paths, and send data and return the payloads to end users as HTTP responses.
The sections below elaborate further on the configurations of the application and how it works to respond to end user requests.
storePersonFlow
This flow makes use of five building blocks to receive, process, and respond to end user requests. When an end user request reaches the application, the first building block it meets is HTTP Inbound Endpoint, which listens to POST requests at http://localhost:8081/person.
Then, the flow converts the JSON data structure from the payload into a Person Object. The conversion uses the uuid() function to generate a unique ID for each person. This ID will be used as a key in a map where values are of the Person data type.
Next, the payload is set to a String:
{ "personId": "123456789", "message": "Person was created"}Finally, Mule moves the message back to the HTTP Inbound Endpoint, which simply returns the message payload as the response to the end user.
retrieveAllPersonsFlow
This flow makes use of three building blocks to receive, process, and respond to end user requests. When an end user request reaches the application, the first building block it meets is HTTP Inbound Endpoint. Because it has a two-way message exchange pattern, this HTTP endpoint is responsible for both receiving requests from, and send sending responses to, the end user.
Next, the flow retrieves all persons from Object Store and converts the persons' list to JSON.
Finally, Mule moves the message back to the HTTP Inbound Endpoint, which simply returns the message payload as the response to the end user.
retrievePersonFlow
This flow is responsible for retrieving a specific person's data, based on the provided person ID. It starts with an HTTP Inbound Endpoint, which listens at http://localhost:8081/person/{personId}.
Next, the flow retrieves the person from Object Store based on personId value (URI parameter) and converts the response to JSON.
This flow defines an exception strategy in order to correctly process requests for non-existing records. In such cases, error status codes and phrases are returned to the end user.