Login Form Using the HTTP Connector
Illustrates how to use Mule Runtime to build a simple HTTP application with a login form. After reading this document, and creating and running the example in Mule, you should be able to leverage what you have learned to create an HTTP request-response application that is able to process incoming HTTP requests containing submitted form data.
Using Parse Template and the HTTP connector
This example was designed to demonstrate Mule's ability to parse and render HTML documents and to handle submitted data through the HTTP connector.
Prerequisites
This document assumes you are familiar with the HTTP connector, and Mule and Anypoint Studio concepts and usage.
Example Use Case
In this example, a user submits a username and a password using the HTML login form provided by the application. The application receives the credentials and responds with the authentication result. This simple case permits only mule/mule pair to be the valid username/password pair.
Set Up and Run the Example
As with other examples, you can create applications straight out of the box in Anypoint Studio. You can tweak the configurations of these use case-based examples to create your own customized applications in Mule.
Follow the procedure below to create, then run the Login form using the HTTP connector application.
- Open the Example project in Anypoint Studio from Anypoint Exchange.
- In your application in Studio, click the Global Elements tab. Double-click the HTTP Listener global element to open its Global Element Properties panel. Change the contents of the Port field to required HTTP port for example, 8081.
- In the Package Explorer pane in Studio, right-click the project name, then select Run As > Mule Application. Studio runs the application and Mule is up and kicking!
- Browse to http://localhost:8081/login.
- Enter mule for username and mule for password. Hit submit button.
You should recieve this response: User mule has been logged successfully!
or otherwise:
Wrong password for username mule
- If you hit http://localhost:8081/requesterLogin, you should see the successful message as the correct credentials are set by the flow and the login is always successful.
How it Works
The Login form using the HTTP connector example application consists of three, simple flows which receives end user HTTP requests, sets payloads based on the request paths and sent data and returns the payloads to end users as HTTP responses.
The sections below elaborate further on the configurations of the application and how it works to respond to end user requests.
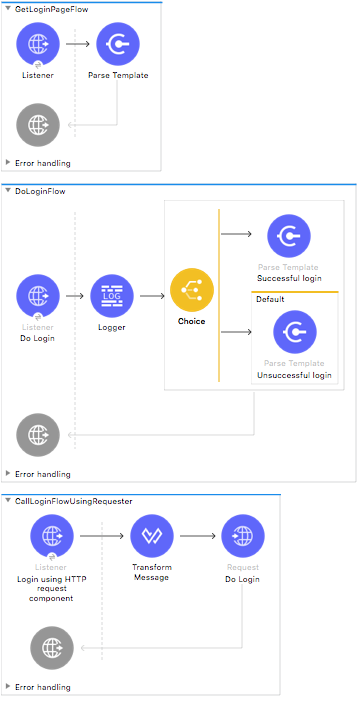
GetLoginPageFlow
This flow makes use of two building blocks to receive and respond to an end user requests. When an end user request encounters the application, the first building block it meets is HTTP Inbound connector. Because it has a two-way message exchange pattern, this HTTP endpoint is responsible for both receiving requests from and sending responses to the end user.
The Parse Template component loads an HTML document from the given location and Mule moves the message back to the HTTP Inbound connector which simply returns the message payload as the response to an end user in the form of HTML.
DoLoginFlow
This flow manually validates the username and password. For a real use case use Mule Security instead.
This flow receives only POST requests as specified in the HTTP Inbound Endpoint. Then the message is logged in to the console to inform about the user attempting to log in.
The following Filter component tests whether the credentials are valid. In this simple case, only mule/mule pair is valid. If the login is successful, then the corresponding message is set as a payload using the Parse Template component.
If the login failed, the processing is routed to the Catch Exception Strategy block that is responsible for setting the return code and message. The message is generated by parsing the predefined template.
Finally, Mule moves the message back to the HTTP Inbound connector which simply returns the message payload as the response to an end user.
CallLoginFlowUsingRequester
This flow is responsible for filling in the correct credentials and calling DoLoginFlow flow in order to make a successful login. It starts with an HTTP Inbound connector that listens at http://localhost:8081/requesterLogin.
This uses an Expression block to create a map of credentials.
The POST HTTP request is made to http://localhost:8081/login with the body containing the previously created credential map which basically fires up DoLoginFlow flow.