Account System API - Salesforce Implementation Template
home
This Anypoint Template provides a foundation for designing an Account System API. It provides means of hiding the complexity of the Salesforce APIs from a user while exposing data in a canonical format. The template abstracts account data from Salesforce into canonical objects that are defined within a CRM System API. This API uses JSON as an exchange format and translates calls into the semantic data structure required by Salesforce.
Operations
The CRM System API supports the following operations:
- GET/accounts
- POST/accounts
- GET/account/{id}
- PUT/accounts/{id}
- DELETE/accounts/{id}
License Agreement
This template is subject to the conditions of the MuleSoft License Agreement. Review the terms of the license before downloading and using this template. You can use this template for free with the Mule Enterprise Edition, CloudHub, or as a trial in Anypoint Studio.
Use Case
This Anypoint template serves as a foundation for API Led Connectivity approach of running an enterprise.
The template is a System API to underlying Salesforce system.
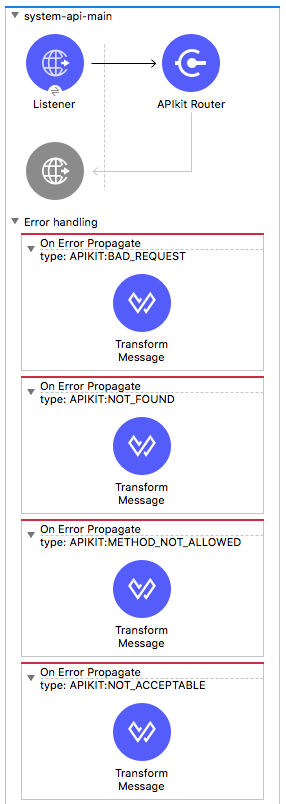
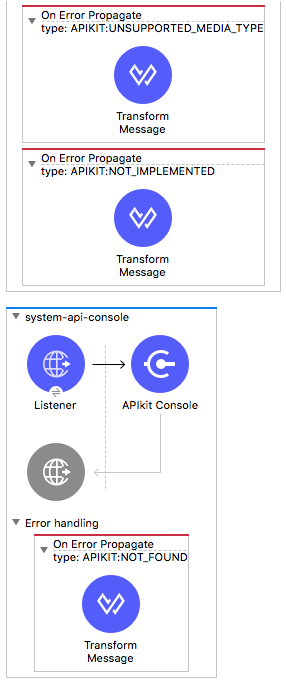
This template is a REST API implemented using APIkit and RAML definition. The basic CRUD operations are implemented for Account object (Customer). The API uses JSON as an exchange format. Included are example requests and responses.
Below are the endpoints that are implemented.
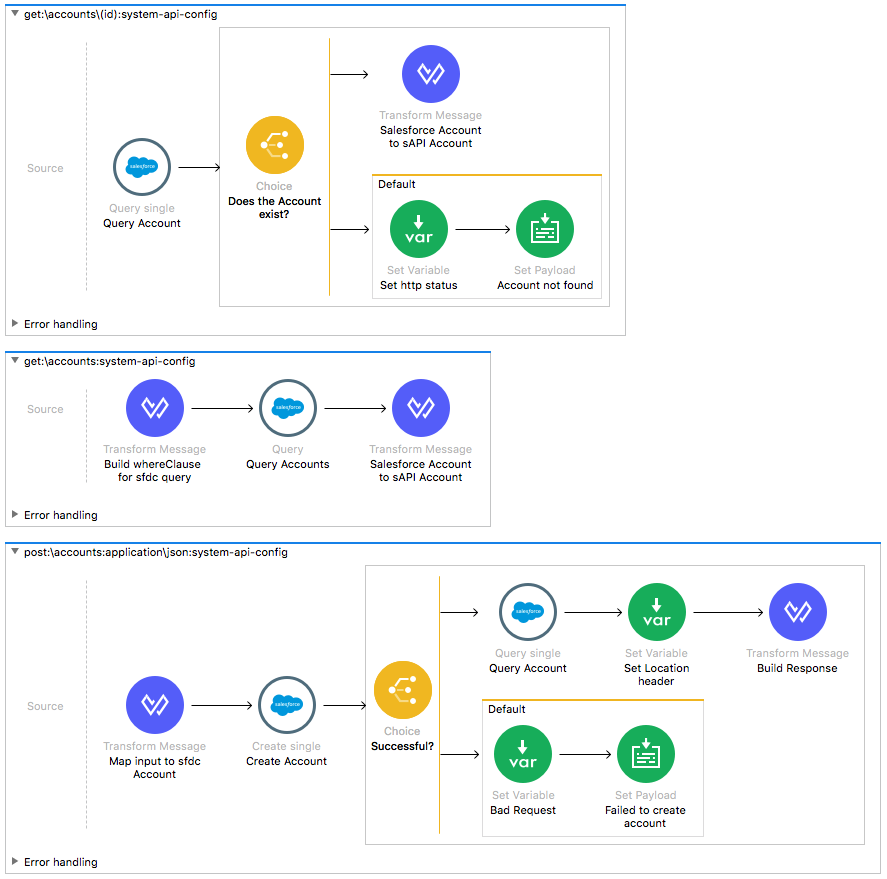
GET /accounts
Retrieves accounts from Salesforce based on the combination of query parameters. At least one of modifiedAfter or name should be set to retrieve results. Look at the included RAML definition to learn more about the implemented query parameters.
POST /accounts
Inserts new Account to Salesforce
GET /accounts/{id}
Retrieves an Account based on the given Salesforce native identifier.
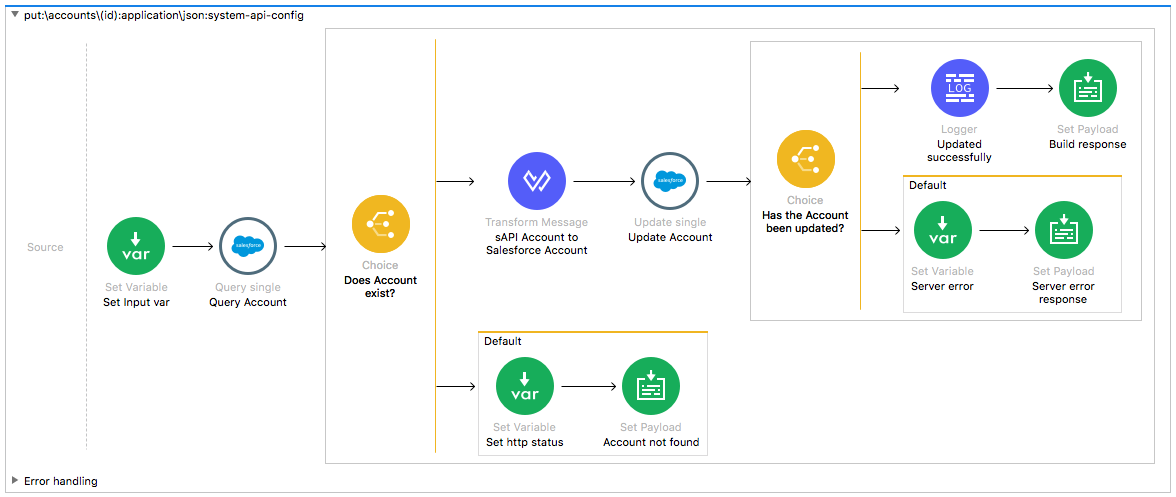
PUT /accounts/{id}
Updates an Account with the data in the HTTP request. All fields are overwritten.
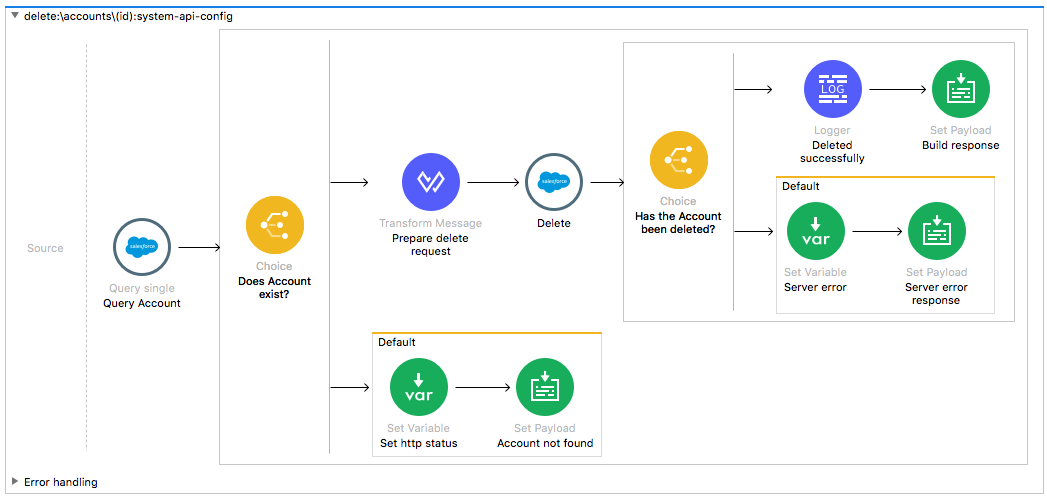
DELETE /accounts/{id}
Deletes specific Account based on the given Salesforce native identifier.
Look at the included self-descriptive RAML definition and the corresponding flows to learn more about the flows.
Considerations
To make this template run, there are certain preconditions that must be considered. All of them deal with the preparations in both source and destination systems, that must be made for the template to run smoothly. Failing to do so can lead to unexpected behavior of the template.
Salesforce Considerations
Here's what you need to know about Salesforce to get this template to work:
- Where can I check that the field configuration for my Salesforce instance is the right one? See: Salesforce: Checking Field Accessibility for a Particular Field.
- How can I modify the Field Access Settings? See: Salesforce: Modifying Field Access Settings.
As a Data Source
If the user who configured the template for the source system does not have at least read only permissions for the fields that are fetched, then an InvalidFieldFault API fault displays.
java.lang.RuntimeException: [InvalidFieldFault [ApiQueryFault
[ApiFault  exceptionCode='INVALID_FIELD'
exceptionMessage='Account.Phone, Account.Rating, Account.RecordTypeId,
Account.ShippingCity
^
ERROR at Row:1:Column:486
No such column 'RecordTypeId' on entity 'Account'. If you are attempting
to use a custom field, be sure to append the '__c' after the custom field
name. Reference your WSDL or the describe call for the appropriate names.'
]
row='1'
column='486'
]
]
Run it!
Simple steps to get this template running.
See below.
Running On Premises
In this section we detail the way you should run your template on your computer.
Where to Download Anypoint Studio and the Mule Runtime
If you are new to Mule, download this software:
Note: Anypoint Studio requires JDK 8.
Importing a Template into Studio
In Studio, click the Exchange X icon in the upper left of the taskbar, log in with your Anypoint Platform credentials, search for the template, and click Open.
Running on Studio
After you import your template into Anypoint Studio, follow these steps to run it:
- Locate the properties file
mule.dev.properties, in src/main/resources. - Complete all the properties required as per the examples in the "Properties to Configure" section.
- Right click the template project folder.
- Hover your mouse over
Run as. - Click
Mule Application (configure). - Inside the dialog, select Environment and set the variable
mule.envto the valuedev. - Click
Run.
Running on Mule Standalone
Complete all properties in one of the property files, for example in mule.prod.properties and run your app with the corresponding environment variable to use it. To follow the example, use mule.env=prod.
Running on CloudHub
When creating your application in CloudHub, go to Runtime Manager > Manage Application > Properties to set the environment variables listed in "Properties to Configure" as well as the mule.env value.
Deploying a Template in CloudHub
In Studio, right click your project name in Package Explorer and select Anypoint Platform > Deploy on CloudHub.
Properties to Configure
To use this template, configure properties such as credentials, configurations, etc. in the properties file or in CloudHub from Runtime Manager > Manage Application > Properties. The sections that follow list example values.
Application Configuration
Common Configuration
- http.port
9090
Salesforce Connector Configuration
- sfdc.username
user@company.com - sfdc.password
secret - sfdc.securityToken
h0fcC2Y7dnuH7ELk9BhoW0xu
API Configuration
- api.domain
your-sfdc-api.cloudhub.io - api.basePath
/api
Customize It!
This brief guide provides a high level idea of how this template is built and how you can change it for your needs. As Mule applications are based on XML files, this page ise organized by describing what conforms to the template. More files can be found such as test classes and Mule application files, but to keep it simple we focus on this XML file:
- system-api.xml
system-api.xml
The functional aspect of this template implemented in this XML file creates or updates objects in the destination system for a given use case. You can customize and extend the logic of this template in this XML to more specifically meet your needs.
Configuration for connectors and properties place holders are also set in this file. Even though you can change the configuration here, all parameters that can be modified here are in properties file, which is the recommended place to do it. If you want to do core changes to the logic, modify this file.
In the Studio visual editor, the values in this file can be found on the Global Element tab.