Salesforce and NetSuite Opportunity Migration
home
Moves a large set of opportunities from Salesforce to NetSuite. You can trigger this manually or programmatically with an HTTP call.
Opportunities are upserted so that the migration can be run multiple times without creating duplicates. This template uses batch to efficiently process many records at a time.
License Agreement
Using this template is subject to the conditions of this MuleSoft License Agreement. Review the terms of the license before downloading and using this template. In short, you are allowed to use the template for free with Mule Enterprise Edition, CloudHub, or as a trial in Anypoint Studio.
Use Case
As a Salesforce administrator I want to synchronize Opportunities from Salesforce to NetSuite.
This template should serve as a foundation for the process of migrating Opportunities from Salesforce instance to NetSuite, being able to specify filtering criteria and desired behavior when an opportunity already exists in the destination system.
As implemented, this template leverages the Batch Module.
First the template queries Salesforce for all the existing opportunities that match the filtering criteria. An account in Salesforce is represented by a Customer in NetSuite. In Salesforce it is possible to have an Opportunity without an associated Account, but in NetSuite, the Customer field is required in the Opportunity. The template fetches and migrates only Opportunities with an associated Account.
In the Process stage Customer is looked up by Opportunity Account name. If the Customer is found, the first one is selected to be used in NetSuite Opportunity. If it is not found, then new Customer is created with user defined subsidiary.
The last step of the Process stage upserts the Opportunities into NetSuite based on the externalId field of the NetSuite Opportunity which should match the Salesforce Opportunity ID.
Finally during the On Complete stage the template prints output statistics data on the console and sends a notification email with the results of the batch execution.
Considerations
For correct mapping of the Salesforce Opportunity stage to NetSuite Opportunity status, check DataWeave function stageToStatus() in Opportunity To OPPORTUNITY mapping. It should be checked if it contains correct data. The predefined data can be modified or new data can be added. If the Salesforce Opportunity stage is not found in the table the default value will be used. It can be specified in the nets.opportunity.status.internalId property.
The relevant data can be found this way:
- Salesforce: Setup > Customize > Opportunities > Fields > Stage
- NetSuite: Setup > Sales > Customer Statuses
Customer must be assigned to a subsidiary. In this template, this is done statically and you must configure the property file with subsidiary internalId, which is already in the system. You can find this number by entering 'subsidiaries'
in the NetSuite search field and selecting 'Page - Subsidiaries'. When you click the 'View' next to the subsidiary chosen, you see the ID in the URL line. Use this ID to populate the nets.subsidiaryId property in the property file.
Salesforce FAQ
Consider these issues:
- Where can I check that the field configuration for my Salesforce instance is the right one? See: Salesforce: Checking Field Accessibility for a Particular Field
- Can I modify the Field Access Settings? How? See: Salesforce: Modifying Field Access Settings
As a Data Source
If the user configured in the template for the source system does not have at least read only permissions for the fields that are fetched, then a InvalidFieldFault API fault appears.
java.lang.RuntimeException: [InvalidFieldFault
[ApiQueryFault [ApiFault  exceptionCode='INVALID_FIELD'
exceptionMessage='Account.Phone, Account.Rating,
Account.RecordTypeId, Account.ShippingCity
^
ERROR at Row:1:Column:486
No such column 'RecordTypeId' on entity 'Account'. If you are
attempting to use a custom field, be sure to append the '__c'
after the custom field name. Reference your WSDL or the
describe call for the appropriate names.'
]
row='1'
column='486'
]
]
Run it!
When run, this template lists output like this you see after browse to the HTTP endpoint:
Batch Process initiated
ID: 42424242-7c96-11e3-9a65-abcdefbaddo9
Records to Be Processed: 9
Start execution on: Thu Sep 6 08:05:33 CEST 2018
Importing the Template into Studio
In Studio, click the Exchange X icon in the upper left of the taskbar, log into your
Anypoint Platform credentials, search for the template, and click Open.
Running on Studio
After opening your template in Anypoint Studio, follow these steps to run it:
- Locate the properties file
mule.dev.properties, in src/main/resources - Complete all the properties required as per the examples in the section "Properties to be configured".
- Once that is done, right click your template project folder .
- Hover your mouse over
Run as. - Click
Mule Application (configure). - Inside the dialog, select Environment and set the variable
mule.envto the valuedev. - Click
Run.
Running on Mule Standalone
Complete all properties in one of the property files, for example in mule.prod.properties and run your app with the corresponding environment variable to use it. To follow the example, this is mule.env=prod.
After this, to trigger the use case browse to the local HTTP endpoint with the port you configured in your file. If port 9090, then browse to http://localhost:9090/migrate and the report is sent to the emails configured.
Running on CloudHub
While creating your application on CloudHub (Or you can do it later as a next step), you need to go to Deployment > Advanced to set all environment variables detailed in "Properties to be configured" as well as the mule.env.
Once your app is set and started, if you choose as domain name sfdc2netsOpportunityMigration to trigger the use case you just need to hit http://sfdc2netsOpportunityMigration.cloudhub.io/migrate and report is sent to the emails configured.
Deploying Your Template on CloudHub
In Studio, right click your project name in Package Explorer and select
Anypoint Platform > Deploy on CloudHub.
Properties to be configured - With Examples
In order to use this Mule template you need to configure properties (Credentials, configurations, etc.) either in properties file or in CloudHub as Environment Variables.
Application Configuration
- http.port
9090 - page.size
200
Salesforce Connector Configuration
- sfdc.a.username
PollyHedra@org - sfdc.a.password
HedraPassword123 - sfdc.a.securityToken
avsfwCUl7apQs56Xq2AKi3X - sfdc.a.url
https://login.salesforce.com/services/Soap/u/32.0
NetSuite Connector Configuration
- nets.email
email@example.com - nets.password
password - nets.account
ABCDEF1234567 - nets.roleId
1 - nets.applicationId
77EBCBD6-AF9F-11E5-BF7F-FEFF819CDC9F
NetSuite Required Fields
- nets.customer.subsidiary.internalId
1 - nets.opportunity.status.internalId
10
SMTP Services Configuration
- smtp.host
smtp.gmail.com - smtp.port
587 - smtp.user
email%40example.com - smtp.password
password
Email Details
- mail.from
batch.migrateOpportunities.migration%40mulesoft.com - mail.to
your@email.com - mail.subject
Batch Job Finished Report
API Calls
Salesforce imposes limits on the number of API Calls that can be made. However, we make API call to Salesforce only once during migration, so this is not something to worry about.
Customize It!
This brief guide provides a high level idea of how this template is built and how you can change it according to your needs.
As Mule applications are based on XML files, this page is organized by describing the XML that conform the template.
More files can be found such as test classes and Mule application files, but to keep it simple the following sections focus on the XML files.
The main XML files in this application are:
- config.xml
- businessLogic.xml
- endpoints.xml
- errorHandling.xml
config.xml
Configuration for connectors and configuration properties are set in this file. Even you can change the configuration here, all parameters that can be modified here are in properties file, and this is the recommended place to do it so. If you want to do core changes to the logic you need to modify this file.
In the visual editor they can be found on the Global Element tab.
businessLogic.xml
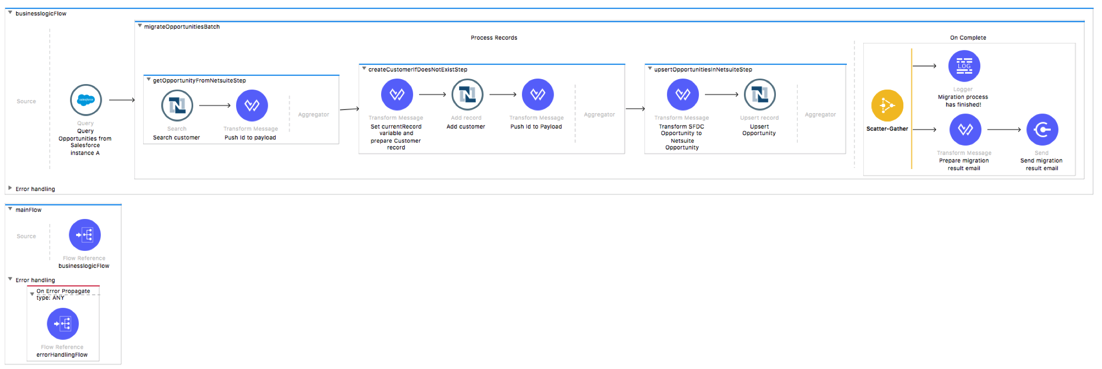
Functional aspect of the template is implemented in this XML file, directed by one flow responsible of conducting the aggregation of data, comparing records, and finally formating the output, in this case being a report.
- Job execution is invoked from the trigger Flow (endpoints.xml).
- During the Process stage, each opportunity is filtered based on specified criteria.
- Account associated with Salesforce Opportunity is migrated to Customer associated with Opportunity in NetSuite. The matching is performed by querying a NetSuite instance for an entry with companyName same as the given Salesforce Account name.
- The next step inserts a new Opportunity record into the NetSuite instance if there was none found in the previous step or update the existing one.
- The final step sends the execution report with statistics to the email addresses you set.
endpoints.xml
This file has the inbound and outbound sides of your integration app.
This template uses an HTTP Listener connector as the way to trigger the use case.
Trigger Flow
HTTP Listener Connector - Start Report Generation
${http.port}is set as a property to be defined either on a property file or in CloudHub environment variables.- The path configured by default is
migrateopportunitiesand you are free to change for the one you prefer. - The host name for all endpoints in your CloudHub configuration should be defined as
0.0.0.0. CloudHub then routes requests from your application domain URL to the endpoint.
errorHandling.xml
This handles how your integration reacts depending on the different exceptions.
This file provides error handling referenced by the main flow in the business logic.