Salesforce Org to Org Custom Object Bidirectional Sync
home
Bidirectionally synchronizes custom object data between two Salesforce organizations. This template makes it fast to configure the fields to synchronize, how they map, and criteria for when to trigger a synchronization.
Parent accounts are created if they don’t already exist in the destination org, or this template can be configured to link all custom objects to a specific account. This template can trigger either using the Mule polling mechanism or can be easily modified to work with Salesforce outbound messaging to better utilize Salesforce API calls. This template uses Mule batching and watermarking capabilities to capture only recent changes, and to efficiently process large numbers of records.

License Agreement
This template is subject to the conditions of the MuleSoft License Agreement. Review the terms of the license before downloading and using this template. You can use this template for free with the Mule Enterprise Edition, CloudHub, or as a trial in Anypoint Studio.
Use Case
As a Salesforce admin I want to synchronize my cases in org A with custom objects from Salesforce org B.
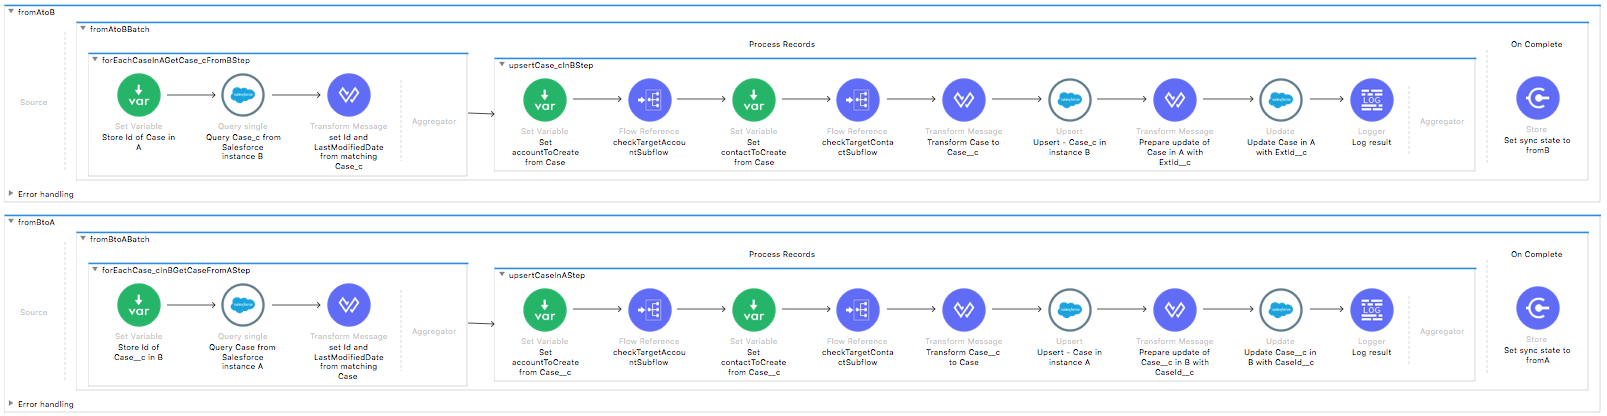
This template serves as a foundation for setting an online bidirectional sync of cases and custom objects between two Salesforce instances with ability to specify filtering criteria.
The main behavior of this template is fetching data for changes (new or modified cases or custom objects) that have occurred in any of the Salesforce instances during a defined period of time. For those cases or custom objects, that were identified not present in the target instance, the integration triggers an upsert operation (to update or create depending on the existence of the object in the target instance) taking the last modification of the object as the one that should be applied.
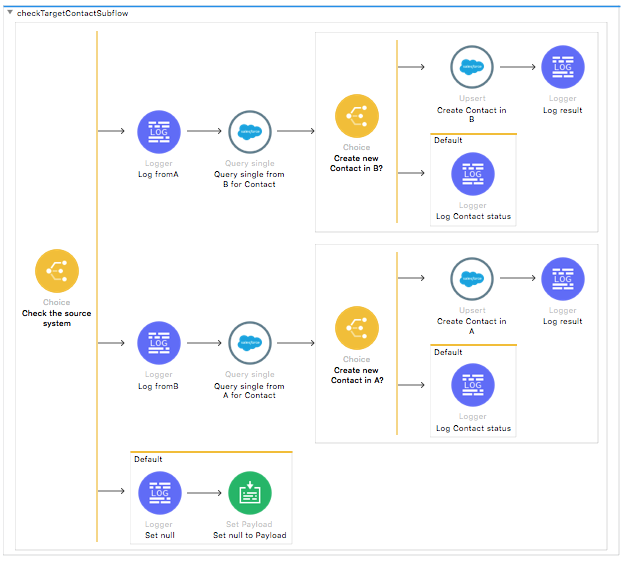
Additionally, there are two sub-flows that synchronize accounts and contacts if the case in org A or a Case__c custom object in org B for a one time integration.
If the account or contact field in the Case object is specified and the account or contact does not exist in the other org, the template creates it there for the first time.
The matching criteria for an account is the Account Name field. The matching criteria for a contact is the Email field.
Requirements have been set not only to be used as examples, but also to establish starting point to adapt the integration to any given requirements.
Considerations
To make this template run, there are certain preconditions that must be considered. All of them deal with the preparations in both,
that must be made for the template to run smoothly.
Failing to do so can lead to unexpected behavior of the template.
Salesforce Considerations
Here's what you need to know about Salesforce to get this template to work:
- Where can I check that the field configuration for my Salesforce instance is the right one? See: Salesforce: Checking Field Accessibility for a Particular Field.
- How can I modify the Field Access Settings? See: Salesforce: Modifying Field Access Settings.
As a Data Source
If the user who configured the template for the source system does not have at least read only permissions for the fields that are fetched, then an InvalidFieldFault API fault displays.
java.lang.RuntimeException: [InvalidFieldFault [ApiQueryFault
[ApiFault  exceptionCode='INVALID_FIELD'
exceptionMessage='Account.Phone, Account.Rating, Account.RecordTypeId,
Account.ShippingCity
^
ERROR at Row:1:Column:486
No such column 'RecordTypeId' on entity 'Account'. If you are attempting
to use a custom field, be sure to append the '__c' after the custom field
name. Reference your WSDL or the describe call for the appropriate names.'
]
row='1'
column='486'
]
]
As a Data Destination
There are no considerations with using Salesforce as a data destination.
Run it!
Simple steps to get this template running.
In order to have your application up and running you just need to complete two simple steps:
Running On Premises
In this section we help you run this template on your computer.
Where to Download Anypoint Studio and the Mule Runtime
If you are new to Mule, download this software:
Note: Anypoint Studio requires JDK 8.
Importing a Template into Studio
In Studio, click the Exchange X icon in the upper left of the taskbar, log in with your Anypoint Platform credentials, search for the template, and click Open.
Running on Studio
After you import your template into Anypoint Studio, follow these steps to run it:
- Locate the properties file
mule.dev.properties, in src/main/resources. - Complete all the properties required as per the examples in the "Properties to Configure" section.
- Right click the template project folder.
- Hover your mouse over
Run as. - Click
Mule Application (configure). - Inside the dialog, select Environment and set the variable
mule.envto the valuedev. - Click
Run.
Running on Mule Standalone
Fill in all properties in one of the property files, for example in [mule.dev.properties] (./src/main/resources/mule.dev.properties) and run your app with the corresponding environment variable to use it. To follow this example, use mule.env=dev.
Running on CloudHub
When creating your application in CloudHub, go to Runtime Manager > Manage Application > Properties to set the environment variables listed in "Properties to Configure" as well as the mule.env value.
To create your application on CloudHub you should to go to Deployment > Advanced to set all environment variables detailed in Properties to Configure as well as in the mule.env file.
Deploying a Template in CloudHub
In Studio, right click your project name in Package Explorer and select Anypoint Platform > Deploy on CloudHub.
Properties to Configure
To use this template, configure properties such as credentials, configurations, etc.) in the properties file or in CloudHub from Runtime Manager > Manage Application > Properties. The sections that follow list example values.
Application Configuration
- scheduler.frequency
10000The milliseconds that will run between two different checks for updates in either Salesforce instance - scheduler.startDelay
15000 - watermark.default.expression
2018-02-25T11:00:00.000ZThis property is an important one, as it configures what should be the start point of the synchronization. If the use case includes synchronization of every case created from the begining of the times, you should use a date previous to any case creation (perhaphs1900-01-01T08:00:00.000Zis a good choice). If you want to synchronize the contacts created from now on, then you should use a default value according to that requirement (for example, if today is April 21 of 2018 and it's eleven o'clock in London, then you could use the following value2018-04-21T11:00:00.000Z).
Salesforce Connector Configuration for Company A
- sfdc.a.username
bob.dylan@orga - sfdc.a.password
DylanPassword123 - sfdc.a.securityToken
avsfwCUl7apQs56Xq2AKi3X - sfdc.a.integration.user.id
005d0000000yYC7AAMNote: To find the correct sfdc.a.integration.user.id value, please, refer to example project Salesforce Data Retrieval in Anypoint Exchange.
Salesforce Connector Configuration for Company B
- sfdc.b.username
joan.baez@orgb - sfdc.b.password
JoanBaez456 - sfdc.b.securityToken
ces56arl7apQs56XTddf34X - sfdc.b.integration.user.id
005i0000002qZ75AAENote: To find out the correct sfdc.b.integration.user.id value, please, refer to example project Salesforce Data Retrieval in Anypoint Exchange.
Configuration Properties
The Scheduler Frequency is expressed in milliseconds (different time units can be used) and the Watermark Default Expression defines the date to be used to query the first time the integration runs.
The date format accepted in the Salesforce Query Language is either YYYY-MM-DDThh:mm:ss+hh:mm or you can use constants like YESTERDAY for example. More information about Dates in Salesforce.
The query fields list must include both `Email` and `LastModifiedDate` fields, as those fields are embedded in the integration business logic.
Structure of the Case Object
To match pair Case object in org A with Case custom object in org B we needed to extend the Case object in org A with the following field:
- ExtId__c
Text(50) External ID\ _external ID which is referencing ID of Case_c in org B
Feel free to customize the name of this field, but keep in mind that you need to update all occurrences in flows for this particular field reference.
Structure of the Case Custom Object
In this template we named the Custom object Case, that is the API name of the Custom object in org B is Case__c, so for all OSQL queries, DataWeave conversions are issued to this particular object.
Case__c custom object inherits all required fields from Case in org A together with Description__c, Subject__c text fields and Contact__c and Account__c lookup fields.
- Account__c
Lookup(Account) - CaseId__c
Text(50) External IDexternal id which is referencing ID of Case in org A - Contact__c
Lookup(Contact) - Description__c
Text(50) - Origin__c
Text(50) Required - Priority__c
Text(50) Required - Status__c
Text(50) Required - Subject__c
Text(50)
This structure may be customized but keep in mind that you will then need to set these:
- Update query
fetch case__c objects from Binendpoints.xmlto fetch all extra fields - Update DataWeave transformer
transform Case to Case__c - Update DataWeave transformer
transform Case__c to Case
API Calls
Salesforce imposes limits on the number of API calls that can be made. Therefore calculating this amount may be an important factor to consider.
Case or Case custom object template calls to the API can be calculated using the formula:
1 + CasesToSync + 2 / CommitSize
Where CasesToSync is the number of Cases to be synchronized on each run.
Divide by CommitSize because by default, for each Upsert API call, Case objects are gathered in groups of a number defined by the Commit Size property.
Also consider that these calls are executed repeatedly every polling cycle.
For instance if 10 records are fetched from origin instance, then at least 13 API calls are made (1 + 10 + 2).
Customize It!
This brief guide provides a high level understanding of how this template is built and how you can change it according to your needs. As Mule applications are based on XML files, this page describes the XML files used with this template. More files are available such as test classes and Mule application files, but to keep it simple, we focus on these XML files:
- config.xml
- businessLogic.xml
- endpoints.xml
- errorHandling.xml
config.xml
This file provides the configuration for connectors and configuration properties. Only change this file to make core changes to the connector processing logic. Otherwise, all parameters that can be modified should instead be in a properties file, which is the recommended place to make changes.
businessLogic.xml
This file holds the functional aspect of the template, directed by one flow responsible of conducting the business logic.
endpoints.xml
This is the file where you will find the inbound and outbound sides of your integration app. It is intented to define the application API.
errorHandling.xml
This file handles how your integration reacts depending on the different exceptions. This file provides error handling that is referenced by the main flow in the business logic.